Littlebit fun with Jenkins.
17 Dec 2014Finally I decided to write about configuring Jenkins server, which is absolutely must have tool for any software project. This is how project itself describe what Jenkins is on their own web site:
In a nutshell Jenkins CI is the leading open-source continuous integration server. Built with Java, it provides 1009 plugins to support building and testing virtually any project.
That’s not going to be a full tutorial on how to do a perfect configuration of Jenkins, I am targeting simplicity and as a result goal of this tutorial is providing quick and dirty way to set everything up and have it running ASAP. It’s sort of Jenkins servers in a nutshell for busy entrepreneurs. Also I am going to limit this tutorial only to my system which is Ubuntu and I am planning to use Jenkins for project written in PHP, so all tools going to be for PHP as well. Let’s start with Jenkins installation. First step is to add Jenkins repository for Ubuntu and install package. First adding key
wget -q -O - http://pkg.jenkins-ci.org/debian/jenkins-ci.org.key | sudo apt-key add -
Then adding repo to source list:
sudo add-apt-repository "deb http://pkg.jenkins-ci.org/debian binary/"
Finally installing package:
sudo apt-get update sudo apt-get install jenkins
All those installation steps were taken from http://pkg.jenkins-ci.org/debian/
Once installed you would have next folder created for you /var/lib/jenkins that is basically default location of the Jenkins, sort of home folder of the server. Also it should be immediately accessible at http://localhost:8080/
Please type that URL into your
browser and let’s install all necessary plugins for PHP. To install
plugins go to “Manage Jenkins”->”Manage Plugins”
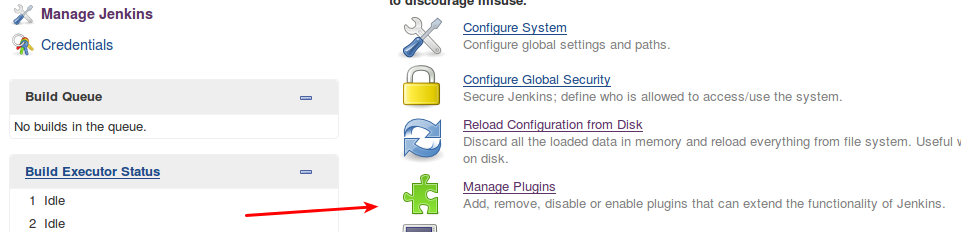 and then open tab “Available”. For PHP we would need next plugins:
- Checkstyle Plugin (there are 2 versions currently available I've chosen latest)
- Clover PHP Plugin
- Crap4J Plugin
- DRY Plugin
- HTML Publisher Plugin
- JDepend Plugin
- Plot Plugin
- PMD Plugin
- Violations
- xUnit Plugin
Select all of these and then click “Download now and install
after restart” and on status page they conveniently offering checkbox
“Restart Jenkins when installation is complete and no jobs are running”,
so I took advantage of that option.
 If installation happens way too fast it could appear that Junkins got
stuck at few last options, what I think happened is plugins got
installed and then Jenkins was restarted, but screen didn’t get
refreshed because previous instance of Jenkins was gone, otherwise
you’ll get something like that:
If installation happens way too fast it could appear that Junkins got
stuck at few last options, what I think happened is plugins got
installed and then Jenkins was restarted, but screen didn’t get
refreshed because previous instance of Jenkins was gone, otherwise
you’ll get something like that:
 Now we have all plugins ready to go, I guess it’s a time to create a first
job, but remember goal is to get up and running as fast as we possibly
can, so I’ve discovered jenkins-php web site and turned out to Sebastian Bergmann who happened to create a template on his site. Let’s add that template into our setup of Jenkins and for those who are wondering I’ve chosen manual path:
Now we have all plugins ready to go, I guess it’s a time to create a first
job, but remember goal is to get up and running as fast as we possibly
can, so I’ve discovered jenkins-php web site and turned out to Sebastian Bergmann who happened to create a template on his site. Let’s add that template into our setup of Jenkins and for those who are wondering I’ve chosen manual path:
cd /var/lib/jenkins/jobs/ sudo mkdir php-template cd php-template sudo wget https://raw.github.com/sebastianbergmann/php-jenkins-template/master/config.xml cd .. sudo chown -R jenkins:jenkins php-template
Once
that done go to “Manage Jenkins”->”Reload Configuration from
Disk”. After configuration is reloaded you will be redirected to a
dashboard where new job “php-template” going to appear. Right after that
you could start messing with it, but I’ve opted to use “php-template”
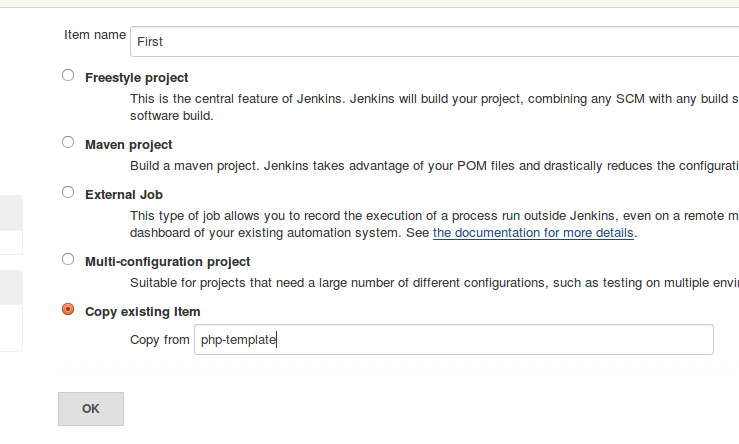
as a true template. So I’ve decided to create new job. Click “New Item”
then enter a name and from radio button options choose “Copy existing
item” and then start typing php-template in the box and you’ll be
offered it for selection. Go ahead and select php-template there. Then
click Ok.
 You will be taken to job configuration script, so I’ve changed description
box and hit “Save”. Once it’s saved you’ll see name of your project and
notice that it is currently disabled, so go ahead and hit “Enable”
button just next to that notification. Now if you go back to the
dashboard you will see 2 projects and “Schedule a build” icon next to
your project. I called my project “First”, so in the rest of this
tutorial I am going to use this name for reference.
Now let’s install few more tools which Jenkins would need to run a first build. Those tools are Ant and JDK:
You will be taken to job configuration script, so I’ve changed description
box and hit “Save”. Once it’s saved you’ll see name of your project and
notice that it is currently disabled, so go ahead and hit “Enable”
button just next to that notification. Now if you go back to the
dashboard you will see 2 projects and “Schedule a build” icon next to
your project. I called my project “First”, so in the rest of this
tutorial I am going to use this name for reference.
Now let’s install few more tools which Jenkins would need to run a first build. Those tools are Ant and JDK:
sudo apt-get install ant sudo apt-get install openjdk-7-jdk
If you have several versions of openjdk installed, for instance I had version 7 as well as version 6 installed, please run next command and choose version 7 as your default:
sudo update-alternatives --config java
So now let’s try to run a build, which I am fairly certain that will fail. But first enable auto refresh of the screen to help you see what the status is. Hit “Schedule build” to see a very first failure, which is going to be:
FATAL: Unable to find build script at /var/lib/jenkins/jobs/First/workspace/build.xml
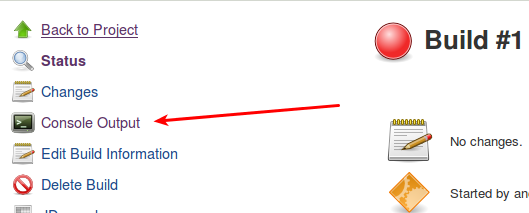
You
could see that message by clicking #{number} on the dashboard for your
project which represents latest build and then choosing “Console
Output”.
 Another positive effect we’ve got from running that first failure is that
Jenkins created all necessary folders structure under your project’s
folder, remember my first project called First.
Another positive effect we’ve got from running that first failure is that
Jenkins created all necessary folders structure under your project’s
folder, remember my first project called First.
So we clearly need to create that build.xml file, however as I said before our goal is have it running as soon as we can, so we going to borrow build.xml from … you guessed correctly Sebastian Bergmann, you could find it here:
cd /var/lib/jenkins/jobs/First/workspace sudo wget http://jenkins-php.org/download/build.xml sudo chown jenkins:jenkins build.xml
Now we will need to create couple more folders and add source code into appropriate place.
cd /var/lib/jenkins/jobs/First/workspace sudo mkdir src sudo mkdir tests
Now it’s a good time to copy your source code into src folder and your tests into tests folder(you could potentially leave tests folder empty, but would have to enable one extra options, I’ll cover it later) after that we can change ownership of those files, I am pretty sure it’s not necessary, however I just trying to avoid any unnecessary failures during Jenkins run.
sudo chown -R jenkins:jenkins src sudo chown -R jenkins:jenkins tests
Project is almost ready, now we need to install couple tools, because those are going to be used during Jenkins run. But first lest switch to some temp folder to avoid any mess in any other place:
cd /tmp
First install phploc:
wget https://phar.phpunit.de/phploc.phar chmod a+x phploc.phar sudo mv phploc.phar /usr/local/bin/phploc
Then install pdepend:
wget http://static.pdepend.org/php/latest/pdepend.phar chmod a+x pdepend.phar sudo mv pdepend.phar /usr/local/bin/pdepend
Then install phpmd:
wget http://static.phpmd.org/php/2.1.3/phpmd.phar chmod a+x phpmd.phar sudo mv phpmd.phar /usr/local/bin/phpmd
Now let’s add default conf file for it, I simply took one from http://jenkins-php.org/configuration.html and placed it into /var/lib/jenkins/jobs/First/workspace/build/phpmd.xml
Then install phpcs:
sudo apt-get install php-pear sudo pear install PHP_CodeSniffer
Again I took example from same page and put it into /var/lib/jenkins/jobs/First/workspace/build/phpcs.xml
Then install phpcpd:
wget https://phar.phpunit.de/phpcpd.phar chmod a+x phpcpd.phar sudo mv phpcpd.phar /usr/local/bin/phpcpd
Then install phpunit:
wget https://phar.phpunit.de/phpunit.phar chmod a+x phpunit.phar sudo mv phpunit.phar /usr/local/bin/phpunit
After that we need to create a simple phpunit.xml you could find it here once downloaded place file into /var/lib/jenkins/jobs/First/workspace/build/phpunit.xml. However I did few changes there, I removed all entries related to bootstrap.php and append all folders path with ../ otherwise it will be looking into wrong folders.
Just in case I have installed xdebug package since I know that xdebug is going to be invoked to generate some metrics.
sudo apt-get install php5-xdebug
Then install phpdox:
wget http://phpdox.de/releases/phpdox.phar chmod a+x phpdox.phar sudo mv phpdox.phar /usr/local/bin/phpdox
Then install xsl extension for PHP:
sudo apt-get install php5-xsl
After that we would also need a config file for phpdox and put it into workspace/build folder:
phpdox --skel > phpdox.xml
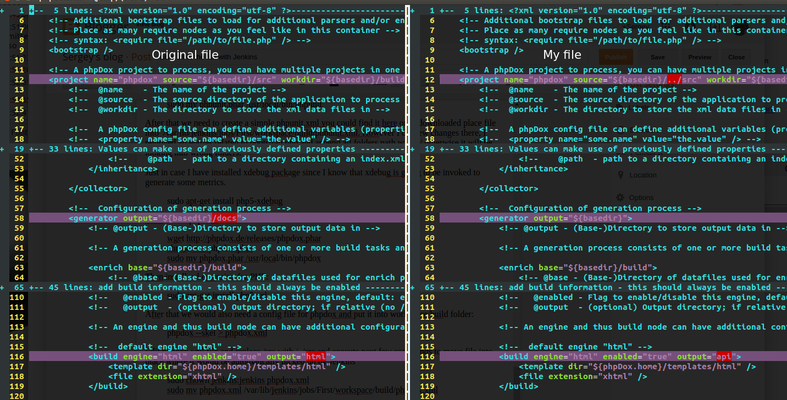
Edit phpdox.xml file and replace /src with /../src in “project” tag, remove
/docs from “generator” tag and then change “html” to “api” in “build”
tag. Here is quick diff:
 After that execute next few commands to move file into place where it would be automatically picked up by Jenkins
sudo chown jenkins:jenkins phpdox.xml sudo mv phpdox.xml /var/lib/jenkins/jobs/First/workspace/build/phpdox.xml
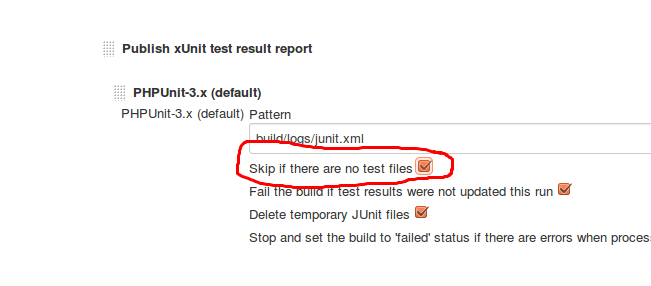
So that’s it technically you could run things and potentially will get
successful “Unstable” build. Last thing I’d like to mention is if you
have no test cases you better enable next option or xUnit will fail
build.
For the most part that’s it in terms of having your first build, there is a good idea to change security settings if you are not the only person on your network. Good luck!